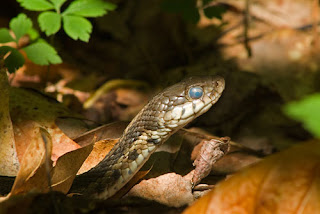
This past weekend, we had unseasonably warm weather for December in South Carolina and I was hit –unseasonably, as well– with a touch of spring fever. I went out on Friday night and walked along the banks of our creek hoping to find a salamander out and about or some other animal revived by the warming trend. I managed to, in fact, spot a salamander in the creek– just barely, before it slipped under the bank–and a lone water boatman lazily dipping, diving and twirling about in a small pool. Other than that, a few raccoon tracks were all that materialized. In the morning, I was amazed to hear a few stray spring peepers getting an early start on their yearly ritual. I quickly ran out into the foggy morning hoping that I could find just one of the tiny amphibians to photograph before winter came back from lunch. My search ended in vain, and I was stuck with the silence that was only broken occassionally by the death rattle of beech leaves, which still clung tightly to slender branches. However, it wasn't long before I became charmed by the forms of the stripped down trees and mist shrouded landscape all around me. If winter is a metaphor for life here in the temperate zone, it most certainly represents our world's need for rest and reflection. In my own life, I find it very difficult to relax at times because I am constantly thinking about my next move and have already begun plotting out what I'll be up to when spring returns next year. Photography in the winter months, here in South Carolina, is very challenging to me because the deciduous areas of the state become stuck in a sort of visual no man's land; between the faded colors of autumn and the verdancy of spring not yet realized. We don't have the cleansing snows of the north and the simplicity of a desert winter. Instead, we are often left with a jumble of denuded forms screaming for attention all at once. It will serve me well to be patient in the understanding that spring will return again soon.
This Haiku by Buson sums up my emotions in three elegant lines:
Winter rain on moss
soundlessly recalls those
happy by gone days
More Winter Haiku can be found here.
Monday, December 22, 2008
Friday, December 12, 2008
ARKiving World Bio-Diversity
ARKive is a really great resourcewebsite and cause whose goal is to create a complete visual record of species worldwide. Not only does the site include stills, but also video and factual information as well. Beyond just being an incredible resource for natural history images, it may become –sadly and most certainly– a place where images of our disappearing species can be preserved for the ages.
Check it out if you have a moment.
Thursday, December 11, 2008
Quick Guide to Exporting JPGs for Web
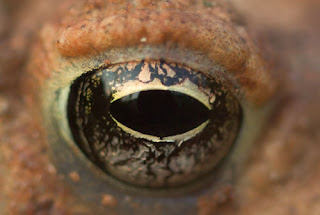
Photographers who are extremely proficient at making beautiful images often express dismay when they see their photos turn into a pale, pixelated resemblance of 'what-was' on-line. Fortunately, there are a few simple things that image-makers can do to increase their odds of creating very pleasing, web-ready images. This very basic and brief tutorial offers several tips that, if used properly, will keep your images looking beautiful on-line.
There are four important areas to consider when preparing an image for Web usage:
1.) Color Space and Color Mode 2.) Sharpness 3.) File Size (which impacts download speed) 4.) Method of Export
1.) Let's address the first issues: Color Space and Color Mode.
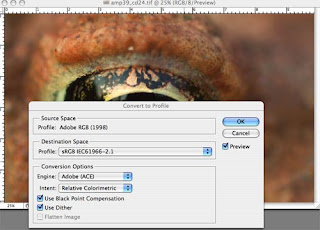
The wikipedia definition is: A color model is an abstract mathematical model describing the way colors can be represented as tuples of numbers, typically as three or four values or color components (e.g. RGB and CMYK are color models). Got that??? More simply put, images need to have certain color spaces assigned to them based on how and where they are being used. It's kind of like looking at the weather report before you head out for work; if it is going to be raining then you wear a rain coat; if it is cold then you wear a sweater. At the end of the day, you are still the same inside but you've just modified yourself –or your appearance– to suit the climate. The color space that works best for the on-line climate is sRGB IEC61966-2.1. This is the color space that presents the most accurate and, more importantly consistent color on most monitors. To set your color mode in Photoshop (CS2), go under Image/Mode/ and select RGB. To set your Color Space go under Edit/Show All Menus/Convert to Profile and scroll down to sRGB IEC61966-2.1 under destination space then select OK. It is simple as that. Now onto file size.
2.) File Size: If you thought people were impatient five years ago regarding digital and electronic matters, things are much worse today. In an era of high-speed connection and the world's increasing demand for instant results, knowing how to create images which load quickly on a page is an essential skill to posses. This article states that the average time that a web-surfer will spend waiting for your site to load is 10 seconds! It's quite possible that this writer may be too generous in their estimation. So, as you might guess, the smaller the file size, the faster the page load.
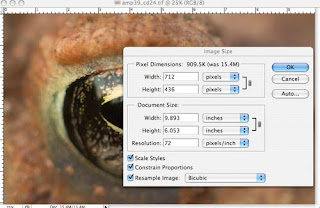
Many of you may know that an image can be transformed into a jpg by simply selecting 'save as' under file/save. However, this isn't the best way to create a jpg for web. This is partially due to the fact that by doing this, your image will also include a space hogging thumbnail of the image as well. Fortunately, there is another method that is both effective and easy to use. Before we get to that, though, you must first make sure that your image's resolution is suitable for web. The industry standard for image resolution is 72 dpi. To see what your image's resolution is in Photoshop, simply go under the 'Image' menu and select 'image size' where you'll find a box containing the magic number. If it is above 72, you can change the number by simply typing in your desired resolution. TIP: In order to keep the physical size of your image from shifting, you must have the 'Resample Image' box checked. Also remember to always save a copy of your master file just in case you make a mistake.
3.) Sharpening: It is at this point that you will want to sharpen your image. However, since I recently covered how to use Unsharp Mask in an earlier post I'll refrain from doing so again. After this step is complete, congratulations, you're ready to export!
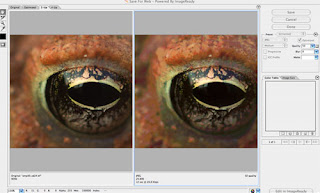
4.) Exporting: Scroll down under the 'File' menu and choose 'Save for Web.' A new window will now pop up on your screen with several tabs across the top. Select the one labeled 2-up. Now you'll see a before and after version of your image; the after being what will be exported to the Web. There are many different options and ways to determine jpg quality here but I like to use 'Optimize to File Size' which can be found under the small drop down activated by the black arrow on the far right-hand side of the window. Once selected, you will be given a text field where you can input the size that you want your image to be. I like to start at 30k as this a fairly quickly loading file size. You should begin to see some differences in image quality between the left and right images on the export screen. Don't see what you were hoping for? No worries! You haven't made any permanent changes so just go back under the 'Optimize for File Size Window' and type in another number until you are pleased with the outcome.
Finally, select 'Save' from the 'Save for Web' menu and your job is done. All you have to do from this point is upload the image to your website or blog!
Monday, December 8, 2008
Unsharp Mask Tutorial Update
Just wanted to follow up with my previous post concerning Unsharp Mask. The staff at Outdoor Photographer magazine were nice enough to post a link to my entry on their blog and supplemented it with a really great tutorial by Photoshop legend Rob Sheppard. Check it out when you have a moment.
Sunday, December 7, 2008
Blog of the Week: Myrmecos
This post marks the beginning of a new series for Natural Imagery called "Blog of the Week." I wanted to use this series to call special attention to sites that inspire me and those that should hopefully be of interest to any one reading this post.
The first slot goes to Myrmecos, a blog by biologist and photographer Alex Wild which explores all things 'ants.' Myrmecos was included in my Top Ten Macro Photography Blogs post several months ago but I wanted to highlight it one more time. There are three reasons that I really enjoy this blog: 1.) The photography is really great; nice, clean, and technically superb. 2.) I've learned a lot about ants reading this blog 3.) Mr. Wild does a great job of regularly posting a mix interesting info and humor; a rare mix in the entomological realm.
I hope that you'll check out this excellent blog when you have a moment.
Thursday, December 4, 2008
Photoshop's Unsharp Mask Demystified
In my photography workshops, I often hear complaints from students who just can't seem to get a sharp image with their digital cameras. This results in many students looking backwards to the "good old days of film" when almost every image looked sharp as a tack. Fortunately, I've got some comforting news for you; digital images are inherently softer and this will often have little to do with photographic technique. This certainly isn't meant to be used as an excuse to slack off on your technique but rather a true statement that addresses an issue common to almost all digital camera users.
Now before I begin, I should dredge up the old cliche' that there are, in fact, exceptions to almost every rule and photography is not exempt from this tenet. Some images do turn out sharp based on shutter-speed, a steady hand and often applied in-camera sharpening. For anyone wanting to take their digital photography beyond just snap shots, though, I would encourage you to avoid adding any sharpening in-camera. This will limit your ability to resize an image for publication or prints in a variety of sizes and will add unwanted degradation to your image in many cases. So, caveat aside, how then does one sharpen an image? The answer is an initially confusing –albeit important–little filter in Photoshop called 'Unsharp Mask', which, by the way, at first reading sounds like it would create the exact opposite effect that you're trying to achieve.
In Photoshop, open up an image that needs sharpening and follow these simple rules for fast results.
1.) Go ahead and set your image view to 100%. This will allow you to keep a close watch on the edges within the image and help you to see if any unwanted noise, or 'fractals, begin to appear.
2.) Open up the Filters Menu and select 'Unsharp Mask.'
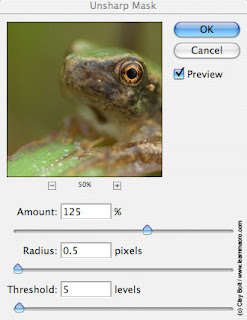
You'll notice that there are three sliders in this dialogue box: Amount, Radius and Threshold. All three are important and I'll tell you from the beginning that most images require settings of their own unless you are adjusting a series of images that were made simultaneously or in a very controlled setting. Experimentation is the key. Before I go into to what each slider means, let me briefly explain to you how Unsharp Mask works.
In the most basic terms, this filter looks for areas within the image where light and dark areas – or groups of pixels– meet. To increase the appearance of sharpness, USM adds varying intensities and amounts of white and black pixels along these edges to give the impression of a sharper edge. So, for example, it will add white, light colored pixels along a dark edge to give the impression of a highlight and darker pixels along a lighter band of pixels to give the appearance of a shadow. This is how the process works in a nutshell. Now, let's get back to how to sharpen your images.
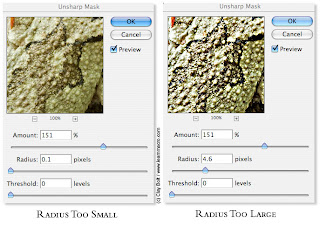
3) RADIUS: I'm going to start with this slider because I believe that this is really the first option that you should consider when adding USM. This option literally refers to the size of the dark/light pixels being added to your image. You will be more successful in your sharpening attempt if you opt to start here. Here is a good rule of thumb that I once heard: if your images contains a lot of detail –say, tree bark, for example– you are going to want to select a smaller radius number because the filter will be able to find a lot of nice, defining edges to sharpen. Add too much of a radius, and the image is going to make your eyeballs pop out with overdone, super unrealistic looking sharpness! With this filter it is often prudent to fall slightly under tack sharp than over it. If your image is generally very soft –say a mist covered field– then you'll want to increase your radius because the filter is going to have a harder time finding a delineating edge, therefore making it more difficult for it to sharpen the scene. In other words, it is going to have to work harder to increase the impression of sharpness.
4.) AMOUNT: This basically refers to intensity –or brightness and darkness– of the pixels being added. Be mindful of this setting because too high of a number will give a very false looking, 'hyper-sharpness' to images. This is why you need to view the image at 100% while adjusting. However, the good news is that you can check the preview option and watch how the amount effects the image by sliding the amount up and down.
5.) THRESHOLD: For ages, I would simply ignore this option because I had no clue what it actually meant. However, once I explain it to you, it should make perfect sense. Taking into account what I've laid-out above, you should now understand that Unsharp Mask lives and dies around finding edges and adding contrasting pixels there. However, what if you have an image where you only want to sharpen a very small portion and not affect the rest? Well, you could do what I used to do and select this small section with a clipping path or lasso tool, feather it and apply USM. However, this is pretty time consuming and often unnecessary. What if you have an image of a bird flying across a nice, clean blue sky. You want to make the bird tack-sharp but in order to do that, you'll need to have a fairly small radius and increase the amount of the pixel intensity. Unfortunately, by doing this you will add a lot of unwanted noise to the sky which is already perfect as shot. The solution? Increase the threshold. In short, an increase in threshold will limit the effect of the USM only to areas with more obvious edges. The more you increase the threshold level, the less the 'softer' areas of the image will be affected. In the case of our bird example, you should be able to set the number to a high enough level to only sharpen the bird and nothing else.
Now that you know the basics the best way to learn is to experiment. However, one final word of advice: always save an unsharpened version of your files. Not only it is good to have a back-up in case you make a mistake but, depending on the size of the file, or how it will be used (art print, magazine, etc.) the amount of sharpening may vary.
Happy Sharpening!
Clay
Thursday, November 20, 2008
How will the economy affect conservation?
As we are all aware of by now, the slumping world economy is affecting every area of business. I fear that this is now starting to include the business of conservation. How can conservation be justified when so many people are out of work and there are many who are barely scraping by? Is conservation a luxury of only the wealthy? I am not an economist and I don't pretend to fully grasp all of the workings of government or the means which it takes to run one. However, I am certain that we still remain -good times or bad times- in a critical environmental juncture and that these are issues that we truly cannot afford to ignore anymore.
So, the question still stands then, how can conservation initiatives still move forward without detracting from all of the families who are being effected by the financial meltdown? I am certain that I don't have any kind of definitive answer. One thing that I do believe, though, is that there are still luxuries that we as Americans (and I certainly include myself in this generalization) are unwilling to give up. I'm afraid that if we don't continue to address climate change and species loss aggressively we may find ourselves –in the very near future– in a much more serious situation which requires a closer examination of such things.
This next year will be financially trying for nearly everyone. I hope that with a new administration, and efforts that are being made to ease the markets, things will get better sooner rather than later. However, when the markets once again go on the rise we will still be left facing a multitude of plants, animals and habitats to whom no bail-out has been given and whose only option is to rely on the importance that Homo sapiens places on their continued existence. Let's hope that we make the right decision.
Monday, October 20, 2008
Outdoor Photographer Magazine Article, November 2008
I am excited to announce that November 2008 issue of Outdoor Photographer Magazine is focusing on my work in their Outdoor Photographer and the Environment Feature. The theme of the article will be South Carolina's mountain/temperate rain forest and the conservation successes and challenges that we are facing at the moment. This is a huge honor for me but, more importantly, it will bring our efforts for protecting this critical habitat to a much bigger stage. The article was written by O.P. associate editor Kim Castleberry and she did a really fine job highlighting the issue. I hope that anyone who reads this post will have a chance to check it out!
Clay
Clay
Monday, September 29, 2008
Mystery Beetle in Upstate South Carolina
This weekend I found a beetle that I haven't been able to identify, nor have I ever seen it before. Of course, this isn't saying much on both accounts. I'm hoping that someone out there can help me to i.d. this beautiful specimen. My first guess is that it is a member of the scarab family but I could be totally wrong. It was about 1" long and was in some leaf litter near a yellow jacket nest (most likely coincidental but you never know).
I'll be passing this link to Ted over at 'Beetles in the Bush' and put him to the test. Hopefully, he'll be able to tell me more about it.
Clay
Monday, September 22, 2008
The Nature Conservancy Protects Land in Pickens, South Carolina
For nearly a year now, I've been providing images to The Nature Conservancy and Upstate Forever to aide their conservation efforts at the Nine Times tract in Pickens, South Carolina. This tract is one of the richest botanical areas in the Southeast and the largest remaining contiguous tract of the land in South Carolina's Upstate. Plants such as Gorge Goldenrod and one of South Carolina's only two populations of monkshood (see image) exists here. Last week, I received the good news that The Nature Conservancy has purchased 560 acres of the property (Little Pink Mountain) from Upstate Forever and will now be managing it going forward. This opportunity was a result of a concerted effort between Upstate Forever & TNC among others.
Although there is still 1700 acres left to purchase, I feel confident that the remaining land will be protected from development. This is a great win for South Carolina and I'm so thankful to have been able to help in my own small way and I look forward to continuing to creating a photographic record of the property going-forward.
Read the official press release here.
Monday, September 15, 2008
Jumping The Rails in Georgetown
A week ago, I went down to Georgetown, South Carolina to photograph a couple of properties for an upcoming book project that I'm working on. This has been a unique experience for me because I, like most photographers, tend to spend weeks or months working a location when it comes to book projects. In this case, I have have had only a couple of days per property. This has certainly been challenging to say the least but in some ways it has really been a great learning experience. I have worked in the advertising industry for a number of years and have learned from my time as an art director that, when your client is flying you and a photographer hundreds of miles away to photograph a location, you don't have the option of coming home without any images. So, there is something refreshing and liberating about arriving a spot and accepting the fact that, no matter what, you've got to capture the essence of where you are at.
The down side to this is obviously that conditions, such as lighting, view-point, etc, can often be less than optimal. However, it also forces one to make images that you would possibly pass over in a better situation. The image that I've included above is of a blackwater branch that borders the property that I was visiting. "Visiting" is somewhat misleading because, when I arrived, there were heaps of "No Trespassing" signs and, so, since I'm not a fan of buckshot I had to rethink my strategy. It then occurred to me that one of the big reasons that the property was preserved was to protect the riparian corridor for this wetland area. I then realized that if I jumped the guard rail along the highway I would be able to gain a fairly decent view of the branch and as it turned out I was, thankfully, the only one who ended up firing a shot.
Clay
Monday, September 1, 2008
Blackwater, sunburns and (no) gopher tortoises in Aiken, South Carolina
On Sunday a friend and I –photographer Greg Kiniry– had a chance to spend the day photographing a couple of different properties in the vicinity of Aiken, South Carolina. The shoot was for a book project that we are both involved with that will hopefully be completed later this year. After meeting up with Greg a little after 5:00 am (okay...I was late), we rode down on a very foggy morning to the southwestern midlands of our state.
It is amazing how coastal this area appears although the ocean is a few hours away. Longleaf pines and wire grass dominated much of the areas that we were focusing on. One of the spots that we visited was the Aiken Gopher Tortoise Heritage Preserve in hopes of finding and photographing one one of these amazing and threatened animals for the project. Unfortunately, the heat was very intense by the time that we made our way to the preserve and I'm sure that any tortoises in the vicinity were eight feet underground along by then.
One of the sites that we were able to photograph well was a small creek/beaver pond that flowed into the south fork of the Edisto river. This beautiful blackwater wetland reflected the clouds like an ebony mirror and really made it very easy for us to create some nice landscape images. The water was full of wildlife including an anhinga, turtles and warblers. Although early morning and late afternoon are typically best for landscapes, I have found that with an interesting sky early afternoon works really well for these types of wetlands.
Thursday, August 28, 2008
The Telegraph, UK picks up Gray Tree Frog Photo; other 'Environmental Photographer of the Year' competition images
The Telegraph of London has posted an on-line gallery featuring the winner of the 2008 CIWEN environmental photographer of the year competition and the remaining 23, highly commended, photographs. I am very humbled to have made one of the highly-commended images to be included in the exhibit. See this post for more information.
Friday, August 22, 2008
Environmental Photographer of the Year Exhibition 2008, London, UK
I received the good news this morning that one of my images (pictured above) will be included in the gallery exhibit for the 2008 Environmental Photographer of the Year Competition. The show will be held at London's Arts Pavilion in the Mile End Ecology Park which is an 'earth sheltered building in a formal landscape setting dominated by the water pools which it overlooks.' The show will be on display from September 17th - October 11th 2008.
The prestigious competition was judged by renowned photographer, author and ILCP member, Gary Braasch who is a recipient of the Ansel Adams Award for Conservation Photography.
This is the official press-release for the competition:
Photographs dealing with some of the most important issues of our time will be on display from 17th September until 11th October 2008 at The Art Pavilion, Mile End Park, east London. The 2008 Environmental Photographer of the Year exhibition includes images that are resonant, creative and beautiful. Over 1,400 pictures were entered into the competition, examining issues such as poverty, climate change, human rights, leisure, culture, biodiversity and natural beauty. The categories were Changing Climates; A World of Difference; Quality of Life; The Natural World; and a special Under 21 category which had no thematic boundaries. The entries were judged on impact, creativity, composition, originality and technical abilities, by some of the most respected environmental photographers in the industry, including Gary Braasch, winner of the Ansel Adams Award for Conservation Photography, Anthony Epes and Ronnie Israel. Lord Smith, acting Chief Executive of the Environment Agency selected the final overall winner who became the Environmental Photographer of the Year.
For more information please visit the official website.
Thursday, August 21, 2008
Landscapes of the Spirit essay by William Neill
World-Class Nature Photographer William Neill has posted a really insightful and inspiring essay on his experiences in nature and nature photography here at 'The Luminous Landscape.' His personal blog is well worth a visit and always a very positive place to discuss great images.
Much of what Mr. Neill expresses in his writing is the moment behind the photograph; the attempt to capture the essence of place rather than always focusing on just capturing a literal image of a landscape of other subject. If you aren't familiar with his work please take a moment to review his portfolio.
Clay
Thursday, August 14, 2008
Four-Hole Swamp, Charleston, SC
I have been spending some time down along the South Carolina coast photographing several properties for a project that I'm currently involved with. One of my absolute favorite places to visit is the Francis Beilder Forest which is a very accessible portion of the Four-Hole Swamp; the largest remaining tract of virgin bald-cypress/tupelo gum swamp in the world. Some of the trees at the preserve are estimated to be around 1,000 years old which means that they were standing long before Columbus arrived in the New World. Incredible when you consider how much has changed since some of these old giants were just seedlings.The swamp is a haven for bird life, reptiles, amphibians and some really great plants. During my 4 hour visit I saw and heard several birds including prothonotary warblers and a barred owl. Four-Hole Swamp is an amazing place to photograph snakes and I was pleased to have an opportunity to photograph this little red-bellied watersnake. I also saw several five-lined skinks sunning themselves on uprooted trees.
One nice surprise was this fairly large fawn sitting quietly just beyond the trail's edge. You really never know what you'll see there; especially if you arrive early.
Tuesday, July 22, 2008
Experimenting with White Balance
I photographed this coral fungi recently and decided to experiment with the image, in camera. At 1x the fungi reminded me of an ice-castle with many spires. So, I set my white balance to Tungsten and as result, the image was produced with this nice, blue coloration. Sometimes throwing accepted conventions to the wind will allow you to produce some really nice images.
Monday, July 21, 2008
Camera Trap Codger
I recently stumbled upon this site while looking for information on creating camera traps. It is a lot of fun to read through and I would highly recommend you taking a look when you have a moment.
Thursday, July 17, 2008
Damselfly and Mud Turtle
Over the weekend, I decided to shoot closer to home and woke up early to photograph dragonflies along the edge of the pond just behind our place.
Although the pond is always frequented by a number of species, I often have difficulty finding specimens to photograph in the a.m. unlike some of the other ponds that I shoot at. Saturday morning was no exception. I have a suspicion that, because the pond is surrounded by fairly thick woods, the dragonflies forgo the low-lying vegetation and rest in the trees during the night. However, as it usually goes in nature, it wasn't long before I caught a glimpse of something else moving in the stream that feeds into the pond.
As it turned out, a little 'mud turtle' –still unidentified–was making its way into the open water. This was the first chance that I've had in two years to actually put my hands on one of the aquatic turtles living here. It had a beautiful ebony carapace with a fairly small plastron. I also noticed that it was missing all of its toes and some of its right foot. It is a tough life out there in the wild.
After making a few images of the turtle, I slowly worked my way up the stream looking for anything of interest. After about thirty minutes I came to a fairly sunny spot that was attracting several, fluttering electric-blue damselflies. I've photographed this species many times before and almost dismissed the scene when I noticed that a couple were opening up their wings a bit more than usual when they landed. The light behind them was nice and soft so I added a 27.5mm extension tube to my 80-200mm zoom, opened up to around f 5.6 and worked my way into a position where I could photograph the dainty insects without obstructing vegetation. As soon as I looked through the lens, I knew that I had something. I immediately began to fire off as many exposures as I could; knowing that at any moment it would fly away. As luck would have it, just after I made the best of the series a yellow-jacket –who seem to be in plague numbers this year– swooped down and scared the damsel from its perch. I suppose it pays to be ready.
Monday, June 30, 2008
Impressionistic Landscape Workshop Follow-Up
Over the weekend, I was privileged to wrap-up a two day photo-workshop called "The Impressionistic Landscape." I couldn't have asked for a better group and they were all very receptive to my ideas for improving right-brain thinking, regardless of how kooky they (the ideas) might've seemed at first. On day one, we learned about the history of Impressionism and studied the works of contemporary photographers who use Impressionistic techniques in their imagery today. These included Freeman Patterson, Jim Brandenburg and William Neill. On day two, we met at Keowee-Toxaway State Park for some hands-on exercises in the field.
The overlying purpose of the class wasn't as much about creating clones of these great photographers as to teach the participants how to have a willingness to approaching their subject matter in different ways. In the end, many of the students ended up with some really nice 'keeper' images and I certainly came away feeling thankful to have an opportunity to get out and shoot with so many nice –and talented– people.
Tuesday, June 24, 2008
High ISO Tapestry Effect
I have been experimenting with a technique that allows me to use the graininess of a high ISO along with a shallow depth-of-field to create a tapestry effect in certain images. This image of a deer, taken in my backyard, is only the beginning in what I hope will be an intriguing set of images. Its subtlety draws me in but I'm not completely sure whether or not this photo is overdone. The jury is still out but there is something that intrigues me about it.
To create this effect I basically turned by ISO to its highest setting (in this case 1600), set my lens to its widest aperture and slightly underexposed the shot by setting the camera to a very high shutter speed. The resulting image was then converted to sepia (or a duotone) in photoshop. Before converting the image to sepia, the image looked really terrible but once the color mode is altered the distracting noise becomes a textural element that creates character in the photo. However, I have seen master photographers like Jim Brandenburg make very successful color images using a high-ISO at low-light.
Tuesday, June 17, 2008
Visiting a Carolina Bay
I received this nice e-mail from Mike Busam of Cincinatti, Ohio in which he describes his recent trip to the Lewis Ocean Bay Heritage Preserve near Conway, South Carolina . We had a chance to correspond about the preserve after he read this post that I wrote a couple of weeks ago. The preserve is just one of the many relatively "unknown" natural areas in South Carolina that should be a "must see" for anyone interested in unique natural history.
"Clay, greetings... Thanks again for the advice and information for
visiting Lewis Ocean Bay Heritage Preserve. I went out on Monday, June 9. Unfortunately, I only had a couple hours, but it was a *great* couple of hours, so I can't complain. I followed your advice and checked out the sites along the road. I didn't go too far off the road because I'm unfamiliar with the area and didn't want to be the "dope from Ohio who gets lost in the pocosins," etc.
I particularly enjoyed the bird life--plenty of Brown-headed
Nuthatches, lots of Pine Warblers, a few Blue Grosbeaks, and then a
Prothonotary and Northern Parula along a narrow creek/wetland that the road cuts through. What a neat array of habitats and birds and plants in one location! Carolinians probably yawn when they see or hear about bears, but we don't have many in SW Ohio, so even the Black Bear tracks in the parking lot near the gazebo at the entrance were interesting to me.
I saw a number of Palamedes Swallowtails, which I've never seen
before, and I took some photos of what might be a Zarucco Duskywing, one of which I attached. If I saw this bug in Ohio, I'd probably call it a Wild Indigo, but the habitat and location make me wonder if it's a Zarucco? I only had a little pocket digital, so I couldn't very close to the skipper.
I had one more question for you regarding the pine trees at Lewis
Ocean Bay. Are those Longleaf Pines? It seems like they're managing
for that kind of system out there--I saw a few areas that have been
burned and logged, or so it seemed, and I saw a couple young trees
that sure looked like what I've read Longleaf Pines should look like,
but I wasn't sure if I wasn't just confusing Loblolly and Slash Pines,
etc, for Longleaf. I understand that the Longleaf was largely
destroyed in the southeast and replaced years ago by Loblolly and
Slash, among other pines. In any case, the sound of the light breeze
going through those trees was neat to hear. The pine trees really
amplify even a modest breeze.
I'm certainly sold on that area, though. The next time we're in South Carolina, I'll certainly visit it again. It's a gem. I can't help but notice all the development around it, which is too bad. In that sense, it's just like all my favorite sites here in southwestern Ohio—lots of development knocking at the door. Hopefully, that 9300 acres will remain safe.
Thanks again for the information. It was very helpful. I studied the
plants you mentioned and it made my brief visit there all the more
interesting, since I had some idea of what to look for."
Take care,
---Mike Busam
Cincinnati, Ohio
Thursday, June 12, 2008
Create a Digital Photo Portfolio: Part 1
In this series, I am going to present an overview of how to create a digital photography portfolio using Adobe InDesign, Photoshop and Acrobat Professional.
Several years ago, photographers who were interested in getting published or showing work in a gallery were required to present a portfolio of slides or prints to potential clients. However today, digital portfolios created with programs such as Adobe InDesign are becoming the norm. This is especially true for preliminary viewing of work. Unfortunately, many photographers use this new approach as an excuse to cast off the time and effort that they used to spend on creating a nice presentation. Large file sizes, awkward transitions and poor color management ring-out like beacons to savy editors and art directors who often see hundreds of portfolios over the span of a given year.
*Note: The workflow that I use for preparing a digital presentation is typically: 1) Lay out text and images in Adobe InDesign,2) Prep images for final file in Adobe Photoshop 3) Export pdf 4) Optimize pdf in Adobe Acrobat
Step One – Selecting Images for your Portfolio
Everyone is not cut out to be a good graphic designer. The good news is that there are few simple rules that you can follow to make your digital portfolio better.
1) Limit the Number of Images: Don't try to cram every single image that you have ever made in your career into your portfolio. If you've only got five strong images that represent your body of work then send five. For gallery and publication promotion try to limit the number of images in the group to between 10-15. If you have 10 really strong images this will typically be enough to peak the interest of the viewer who may then request to see more.
2) Consider a Theme-Based Portfolio: Although it is often a good idea to show that you have a wide-range of different looking images, these days, many photographers are being selected for their particular styles even if the subject matter varies. One could make the argument that the stock photography market of today is so flooded that individual styles can often be one of the only things to differentiate your work from the masses.
3) Limit the Amount of Copy in the Layout: Other than a brief introduction, biography of the artist and short captions to accompany your photos, too much copy in a digital portfolio may be distracting. If your images can't wow the viewer without a long explanation then you should reconsider the images that you have chosen to include.
Now, you're ready for the design and layout process in InDesign. Stay tuned for Part Two of this series.
Friday, June 6, 2008
10 Tips for a Successful Photography Workshop
Over the last couple of years I have begun to lead more and more photo workshops. Each time I work with a group I always strive –and feel great pressure, honestly– for each participant to come away with something worthwhile. In order to do that, I've had to work hard to develop techniques that can apply to a wide range of students. When I first started out, I found it difficult to find any info on developing photographic workshops. In order to help other beginners, here are five goals that I strive for in my workshops.
1) Students first: Although it maybe tempting to spend a great deal of time speaking about your own accomplishments, show restraint. This is especially true if you aren’t a well-known photo veteren. There is a difference between a lecture and a workshop and students are generally in your workshop because they want to learn how make better images or, as Freeman Patterson puts it, “Improve the quality of their lives through photography.” However, students may enjoy hearing about your experiences more if you can relate them to particular exercises as a way to provide context.
2) Allow students to influence the direction of the class: I believe that all workshops need to have some sort of outline and pre-planned direction. Instructors need to do their homework so that the students are able to have the best experience possible during the workshop. However, the class roster may consist of folks who just want to learn how to use their cameras better and if this happens to be the case, I would urge you to "go with it." Some students just aren't at the place where they are ready for abstract, artistic concepts.
3) “Be There” for your students: While it is nice to be able to make images while your students are shooting in the field –especially if the images will be used for a lesson– getting carried away with personal image-making in an inspiring location robs students of the valuable instruction time that they surely signed up for. But, I must add that there is fine line between hovering and helping. Allowing students to work together and have ample shooting time alone is certainly a sensitivity skill that is gained through experience.
4) You can’t please everybody!: When it comes to leading a group in any situation there is almost always going to be a couple of folks who are naturally higher-maintenance and harder to please than the rest of their classmates. Although it is often difficult, avoid spending the majority of your time attempting to appease the unappeasable. This isn’t to say that students who are struggling should be ignored but rather that if a participant comes to your workshop with a bad-attitude that day you need to realize that there is only so much that you can do to make their experience better. Good workshops are comprised up of teamwork between students, teachers and the environment that they are focusing on.
5) Teach them to see: Encourage students to learn how to “See” and not just make a technically correct exposure. Although everyone is not destined to be in the pages of National Geographic we all have experiences in our lives that are worth capturing. Having sensitivity to the best times to shoot will ultimately increase the quality (and experience) of the images that students make.
7) Ask for Input: Allow students to critique your workshop / class when it over. Ask them to be brutally honest and remember that suggestions for improvement are better than praise so…don’t be so sensitive!!! ☺
8) Create a Community: One of the fringe benefits of photo workshops is getting to know other photographers who are interested in the same types of things as you are. Create a database of students and allow them to inform you if they would like their e-mail address to be shared with others. This is a great way for participants to build lasting friendships and share ideas for years after the class is over.
9) Follow up with notes: When I first began to lead photo workshops, I would begin the class by handing out notes for the class. However, I began to realize that many of my students were either losing them during the class or destroying them by cramming the pages into their bags. So, I decided to start sending out a follow-up e-mail with a pdf of the notes. By doing this, I have legitimate reason to follow-up with students and I have received positive feedback from folks that this is a great way to refresh their memory about what we covered in the class.
10) Exhibit a passion for what you are doing: One of the best ways to inspire students is to show them that you have a passion for photography and your subject matter. Enthusiasm is infectious. Believe me, if you attempt to teach a class without a love for what you are doing it will be very obvious to your students and, as a result, it will be very difficult for them to become excited. Although we all have to pay our bills, there are enough photo topics out there that you will surely be able to find something that is exciting to you. If not, you shouldn’t be teaching a class. Remind yourself that you too were once a beginner and how important the role models in your early career were to you.
Hope this helps. I am still learning and have a long way to go so if any of you have any tips of your own please share!
Tuesday, June 3, 2008
Aboard the Amphibian Ark
In response to the sheer number of extinct and endangered species of amphibians being threatened by development, climate change and pathogenic outbreaks, a group of biologists have put a rescue plan into play known as the "Amphibian Ark." Similar in concept to a seed bank, the Ark team collects species of amphibians, which are at risk, and houses them until re-release into the wild is deemed safe.
In the past decade there has been an increase in amphibian die-off and mutation due to a variety of factors including the chytrid fungus, the origin of which still remains a subject of debate. The group, which has been publicized by celebrity biologist Jeff Corwin, has created some innovative ways to get donors involved including a recent contest to name a recently discovered species of Osornophryne frog from Ecuador.
Monday, May 26, 2008
Ethical Nature Photography
This morning I woke up at 5:00 a.m. and headed out to the Lewis Ocean Bay Heritage Preserve in hopes of finding Venus' Fly Traps in the 9300 acre preserve. When I arrived, the sun was just rising up and a beautiful mist had settled over one of the pocosins that I've spent a lot of time exploring in the past. I was tempted to head straight for the pitcher plants and start shooting but decided to stick to my original plan and began looking for sphagnum filled sandy ditches as outlined in Porcher and Raynor's "Guide to the Wildflowers of South Carolina." After about twenty minutes and a little prayer I noticed an unfamiliar patch of white flowers about ten feet from where I was standing. Thinking that they were Carolina Grass-of-Parnassus, I walked over and was amazed to see about 20-30 Venus' Fly Traps at the base of the long stalked flowers. By discovering the fly traps I fulfilled a life-long dream of witnessing these amazing plants in the wild. After my initial euphoria wore of I began to wonder exactly how I might photograph such an iconic and much publicized species. This is where the ethics part came in.
Venus' Fly Traps are a very small species of plant. The specimens that I encountered were only about 3-5 inches high (without the flower) and scattered among wire grass and other plants. The group consisted of a dense center population that radiated outwards with surrounding smaller individuals. As a result, this all made photographing any of the plants very difficult. I have been fortunate enough to discover several 'rare' species in the field and each time the event has been accompanied by a sense of anxiety due to the pressure to make a great image and not destroy the population at the same time. After studying the group of fly traps for some time I decided that it might be very difficult to make any kind of special photo unless I was willing to risk damaging some of the surrounding plants –which I was not– so instead I decided to focus on some of the smaller, outlying plants. As a nature photographer, it is often very easy to get caught up in the moment and lose sight of what it is that you actually photographing. However, no photographic opportunity justifies the destruction of a particular subject. In the end, I am happy with my images and I feel elated to have finally seen such an amazing plant in a place that it has grown for millions of years.
Thursday, May 22, 2008
Developing a Photographic Narrative
One of the greatest challenges that most photographers face –and I am certainly no exception– is finding a way to trim down a potential image to its most basic elements while still retaining enough appealing information that it doesn't lose its intrigue. I refer to this as developing a "photographic narrative." I believe that really strong images should always tell some type of story and at least provide a jumping-off point that will spark the viewers imagination. You want to "dangle a carrot" for the viewer so that you might prompt him/her to ponder about an image time and time again. A great and famous example of this would be the Mona Lisa. Why is this painting still be adored hundreds of years after it was created? I personally don't believe it has as much to do with the quality of the painting as with the fact that folks are drawn into the narrative that Da Vinci cleverly –and surely knowingly– injected into the painting with Mona Lisa's famous smile. We all want to know what she is smiling about, right?
A couple of nights ago I went out for a walk just before sunset. A nice rain had just passed through and a low mist had begun to hang over the field. I was just about to come in for the night when I noticed something odd surrounding the post of one of the old bluebird boxes nearby. As I came closer, I immediately recognized that the odd shape was in fact a black rat snake (my third encounter this spring) that had tightly coiled its body around the post and was working its way up to the nest box (the birds had just fledged). I ran inside to grab my camera gear and came back out with a a great determination to illustate the story of the snake and the box; predator and prey. I photographed the scene with a 20mm wide-angle lens from above, below and straight on. That didn't work. The sky was too washed out and the angle too severe. Next I tried zooming in and shooting from afar but still nothing was working. Meanwhile, the sun was quickly setting and the snake was getting tired of being gawked at. How could I show this powerful predator inching its way for what it hoped might be an evening meal? Then it occurred to me that I should just focus on the form of the animal. The bluebird house was a nice addition but it only served to distract the me from the crux of the shot. By now the snake was fairly calm, and it was fairly cool outside, so I moved within a couple of feet and carefully composed the shot. I became excited as I looked through the view-finder at the snake. It was easy to imagine that it was a piece of sculpture. The field looked great, the reflected sunset on the snake's dew-covered scales appeared iridescent, while the post now became an anchor within the image. It also would provide something for viewers to question and wonder about. I was reminded of my new mantras "Cut out the clutter" and "Create a Narrative." In the end, I may not have created anything like the Mona Lisa but for me, I know that I created a better image by having the willingness to focus in on what really mattered and develop a narrative.
Clay
Wednesday, May 21, 2008
Photographing Carolina Bays
Last year I began making photographs in one of the most unique and biologically rich preserves in South Carolina: The Lewis Ocean Bay Heritage Preserve in Horry County, near Conway, SC. This is a very long name for a sprawling 9300 preserve that is packed with orchids, irises and a variety of other rare and extremely photogenic plant and animal species including the world famous Venus' Fly Trap. The LOBHP contains several 'Carolina Bays' which are mysterious elliptical depressions that range from three acres to over a mile in length.
Carolina Bays were really not discovered until 1933 when an aerial photographic survey was conducted over the Carolinas and Georgia. Two University of Oklahoma professors –Doctors Melton and Schriever– observed the images and were the first to really document the number of bays. Although they range from New Jersey to Florida, the bays are primarily found in South Carolina, North Carolina and Georgia. Because of the unique elliptical shape of the bays and the fact that they are all rimmed with sand banks on their southeastern edges, many scientists believe that they were formed by asteroids. Others researchers tend to believe that erosion led to their creation.
When I visit the bays I try to arrive as early as possible to beat the harsh sun and wind that makes photographing the many orchids and pitcher-plants extremely difficult. Early morning is also a great time to spot animals as the preserves are brimming with wildlife including black bears, bobcats and abundant bird-life. LOBHP is mainly composed of dense evergreen shrub bogs (known as pocosins) and long leaf pine savannas. These moist, open areas are easier to access for photography and I have spent many visits in an area smaller than an acre.
I will be visiting the preserve again in a few days and am really looking forward to exploring deeper into the pocosins and surrounding ecotones in hope of photographing venus-fly traps. The preserve can be intimidating if you don't know where you're going (and I really don't) so a lot of looking around is required. However, I never go home without a few really nice images and each time I visit I am able to zero-in of where the best places to explore are. I'll let you know what turns up!
Clay
Friday, May 16, 2008
Top 10 Macro Photography Blogs and Websites
I've gathered a list of my Top 10 favorite macro photography blogs and websites. Certain selections are included because of the photographic artistry and others because of the great how-to information that can be found on the page.
Oregon Wild
Oregon Wild is a wonderful blog by nature photographer Michael Durham. Although everything on the blog doesn't deal directly with macro, a great portion of it does and the conversational tone that is presented by Mr. Durham makes for a very interesting read.
Insect Photography
This is the website of one of the most brilliant macro photographers on the scene, Piotr Naskrecki. I am always inspired by his work and believe that you will be too. His book, "The Smaller Majority" should be on the bookshelf of every inspiring nature photographer.
Macro Art in Nature
Fellow South Carolinian Michael Brown shares his thoughts about macro photography and art in his blog entitled Macro Art in Nature. His work has a lovely, impressionistic feel that is both beautiful and intriguing.
Plonsky Photo
This is a fantastic site for folks who just beginning to become interested in macro photography and want to learn how too improve their technical know-how. Dr. Plonksy's work is very technical in nature for those of you who are looking for a more scientific approach to macro.
Beetles in the Bush
This blog is like a walk in the woods. I enjoy reading about Missouri entomologist Ted M.'s daily adventures in nature and photography. I believe that you will too!
Insect Macro Photography
Insect Macro Photography is a website by Pennsylvania macro photographer Paul McNelis which contains both an original, ongoing collection of bug photos taken since 2005 as well as a daily blog about the insects that he encounters in the field.
Myrmecos Blog
This is an informative blog with lots of biological info that those of you with an interest in natural sciences will really enjoy. It is the creation of University of Arizona biologist Alex Wild who uses macro photography as part of scientific work on the evolutionary history of insect groups.
Mark Moffet - Portfolio
Although Dr. Mark Moffett, AKA Dr. Bugs, doesn't have a blog, his photography is absolutely incredible. He is the Indiana Jones of the Insect Photography world and his travels have allowed him to make some really great images. This is his portfolio at Minden Pictures. He is also happens to be a very nice guy and was kind of enough to answer some of my most basic questions when I began my journey several years ago.
Mitsuhiko Imamori - Portfolio
Mitsuhiko Imamori is one of my favorite macro photographers. I really enjoy the subtlety in his work and the dreamlike quality of many of his photographs. He is also represented by Minden Pictures.
Macro-Photography-Blog
The is a blog for the casual macro photographer who just enjoys getting closer to nature and seeing the world from a different perspective.
Hope you all enjoy visiting these sites as much as I have. If you have any more suggestions please let me know!
Wednesday, May 14, 2008
Room to Roam
The more time that I spend photographing animals in the field, the more that I've begun to pull away from the tight, crisp, maximum depth-of-field shots that I used to make early-on in my career. Initially, I was so intrigued by what I was photographing that I failed to capture much more than just a shell of subject. It took me a while to realize that there were so many folks who literally had thousands of scientifically accurate photographs in their files of just about anything that I could imagine. It also didn't take long for me to realize that the photographs that I was selling –that really grabbed viewer's attention– were not the perfectly sharp, show-it-all type of images. Jim Brandenburg certainly had a great influence on this departure in my work through his masterpiece, Looking for Summer but it was only this year that I believe that I've finally 'let go' of worrying about making images to fit a certain niche. My subject-matter is still –and I suspect will always be– nature based but I don't worry so much about getting it all in focus. What I'm looking forward is narrative, imagination and passion in my work. In order to reach their maximum potential, every artist must come to a place where he or she realizes that there will only ever be one of themselves in this world and that they will be doing the everyone a disservice if they deny their own unique voice.
I photographed this black rat-snake last weekend on a photo hike with my friend and fellow photographer Greg Kiniry. It was hard not to go in tight on this beautiful creature at first, but as it worked its way toward the rock I anticipated that there might be an opportunity to do something special. Although I had captured several frames before this image presented itself I knew that I wanted to keep the snake small in the frame and give him room to move through its environment. For me, there is a beauty in the image's simplicity that is both closer to what might encounter in the wild and also somewhat symbolic –not intentionally– of where I am at in my life. I don't want to be boxed in. I need room to expand; to grow. I am excited about this turn in my photographic experience and feel that I'm finally hitting my stride.
Tuesday, May 13, 2008
Pencil-Case Bean Bag for Macro
As usual, in pursuit of inexpensive camera supplies I set out to find a good alternative to commercial grade photography bean bags.
To those of you who are new to macro, bean bags are very a useful tool for subjects that lie very low to the ground. Even if you are fortunate enough to own a tripod that can be adjusted to lie quite flat, some subjects remain either too delicate or too short to work well with a tripod. Therefore, the next best solution is a bean bag. It is a very simple and easy-to-use tool that will often reward the photographer sharp images that would otherwise be impossible to make. To use the bean-bag you simply place it near your subject, sit the camera on top and apply pressure with both hands while pressing the shutter. It is (sounds as) simple as that.
One would think that finding a bean bag would be really simple in any craft store or mega-mart but I found this to not be the case. The ones that I did find were just too small for my purposes. To be useful, you really need a bag that is somewhere in the neighborhood of approximately 8" x 10" (for a pro grade slr). You also need a bag that can be sufficiently thick enough to allow your camera to sink into the beans, pebbles, etc. that fill the bag. So, the solution turned out to be a $3.00 jumbo pencil case from the school supplies aisle at my local grocery store. Not only is it cheap, tough and affordable but it also didn't require me to alter it any way– I had considered sewing my own. Another bonus is that it is really handy for carrying filters, etc when I'm traveling and I can remove the beans before packing to avoid unnecessary weight. When I arrive in a location where the bag will be needed I can simply stop by any supermarket and purchase some dry beans to fill it up. Also, I can use the beans to make a trail so that I don't get lost in the woods or feed an angry bean-eating bear on the attack. Okay, those two scenarios only happen 3-5 times a year but you get the idea.
Hope this helps.
Clay
Sunday, May 11, 2008
USA Today Macro Photography Article
For those of you who are just beginning your journey into the world of macro photography –and who didn't get enough of an overview from my posts, Intro to Macro Photography 1, 2 & 3 – check-out this article published in USA Today which gives a nice, albeit brief summary, of the basics of macro photography.
Intro to Macro Photography: Part 3: Critical Techniques
III. Critical Technical Skills for the Beginner–
1.) Understanding Depth-of-Field and Shutter-Speed:
Depth-of-field revolves refers to the sharply and softly focused parts of an image. If an image is mostly soft with only a small section –say an animal’s eyes or the edge of flower’s petal– in sharp focus then you could say that it has a shallow depth-of-field. However, if the image–let’s imagine that it is a landscape, for example– has a sharp background, sharp middle ground, and a sharp image in the foreground then it has a great depth-of-field. In John Shaw’s “Nature Photography Field Guide” (see 'great books' on right side bar) he outlines the four factors which determine the area of sharpness.
“1.) The actual f-stop at which the picture is taken. 2.) The focal length of the lens being used 3.) The size of the subject being photographed and 4.) The distance between the camera and the subject.”
If you examine your S.L.R. lens you will notice a series of f-stops which go around its barrel. This series of markings represent the size of the aperture –or opening– of the iris of the lens. This is determined by whatever f-stop is chosen by the user. This series of numbers typically run from f/2.8, f/4, f/5.6, f/8, f/11, f/16, f/22 and f/32.
Consider the following thoughts:
- The smaller the f-stop number (f/2.8, for ex); the larger the aperture; the shallower the depth-of-field; the more light that comes into the camera.
- The larger the f-stop number (f/32, for ex.); The smaller the aperture; the greater the depth-of-field; the less light that goes into the camera.
This really confused me when I first began learning how to operate a pro camera until I realized the that numbers represented fractions, i.e.: f/2.8 divided by 2 = @ f/4 , f/4 divided by 2 = @ f/5.6 and so on.
Shutter-Speeds control how fast the camera’s shutter opens and closes. This effects the amount of light that comes into the camera and also can determine whether or not an image is in sharp or in soft-focus. Shutter speeds are also listed in fractions (of a second). So, a shutter speed of 1 second is going to keep the aperture open longer than, say, one at 1/1000 of second. If you are wanting to capture a sharp image of a moving subject you must typically set your aperture at 1/125 of a second or less.
There are two approaches that you will most likely have to choose between when composing an image: aperture priority or shutter priority. A good example of a typical aperture priority image might be a “classic Ansel Adams” type of landscape. This is a situation in which you want every rock, tree and tumble weed from where you stand, to the distant horizon, to be in sharp focus. In order for this to occur you are going to want “stop-down” to your smallest aperture (f/22 - f/32 in most cases). Because this is a very small aperture very little light will be entering the camera which can affect the exposure time. So, you must compensate for this by choosing a much slower shutter speed in order to allow the needed light to enter the camera.
A shutter priority image is one where you want to freeze some sort of movement. It might be that you are photographing a sports event and want to make sure that the ball is frozen in mid-air or perhaps you are trying to capture a crystal clear image of a salmon leaping its way up some Alaskan river; either of these would be shutter priority images.
2.) Paralleling the Subject:
When you are creating a close-up photograph of a small subject camera position can have an incredible impact of the results that you get. Because depth-of-field is usually very limited when a subject is being photographed at 1:1 or greater, a movement of just an inch can drastically alter the composition. The photographer must identify the ‘important’ part of the subject that he/she would like to have in sharp focus and attempt to keep the back of the camera (or film plane/digital sensor) as parallel with the subject as possible. This process is very time consuming but can be made easier by using a sturdy tripod to hold the position of the camera.
IV. Composition Techniques–
1.) The Rule of Thirds:
This is one of the most widely used ‘rules’ in photography: Mentally divide the image the image frame into three equal pieces horizontally/vertically and place your subject into one of these spaces. This will help you to avoid placing the image in the center (which is generally not a good ideas but as with most rules, there are exceptions). This will put you on the right path towards creating an image that is interesting and visually pleasing.
2.) Horizontal or Vertical?:
Consider your subject before defaulting to a “horizontal” or “vertical” composition. Although we Westerners tend to scan information from left to right and find a horizontal composition to be a natural choice this isn’t always the best choice. Some images simply call for a vertical composition.
3.) Understanding the Relationship Between Positive and Negative Space:
It is human nature to just focus on the subject when making an image. However, the negative space –or space surrounding your subject– is often as powerful as the main focus area when it comes to affecting how an image appears. If used correctly, negative space can give the viewer’s eye a chance to rest and serves to guide the eye throughout a composition. In order to take an image to the ‘next level’ every aspect of the composition becomes a factor in determining the final outcome.
4.) Pay Attention to Backgrounds:
I cannot tell you how many times I’ve taken what I consider to be a great image only to revisit it later and notice a twig that appears to pierce my subject’s head. Often, only a minor adjustment in camera position is needed to make a mediocre image into a truly great one. Pay attention to what is behind your subject! Use aperture to control how much or how little of the background is in focus; little things done well add up to make a successful photograph!
1.) Understanding Depth-of-Field and Shutter-Speed:
Depth-of-field revolves refers to the sharply and softly focused parts of an image. If an image is mostly soft with only a small section –say an animal’s eyes or the edge of flower’s petal– in sharp focus then you could say that it has a shallow depth-of-field. However, if the image–let’s imagine that it is a landscape, for example– has a sharp background, sharp middle ground, and a sharp image in the foreground then it has a great depth-of-field. In John Shaw’s “Nature Photography Field Guide” (see 'great books' on right side bar) he outlines the four factors which determine the area of sharpness.
“1.) The actual f-stop at which the picture is taken. 2.) The focal length of the lens being used 3.) The size of the subject being photographed and 4.) The distance between the camera and the subject.”
If you examine your S.L.R. lens you will notice a series of f-stops which go around its barrel. This series of markings represent the size of the aperture –or opening– of the iris of the lens. This is determined by whatever f-stop is chosen by the user. This series of numbers typically run from f/2.8, f/4, f/5.6, f/8, f/11, f/16, f/22 and f/32.
Consider the following thoughts:
- The smaller the f-stop number (f/2.8, for ex); the larger the aperture; the shallower the depth-of-field; the more light that comes into the camera.
- The larger the f-stop number (f/32, for ex.); The smaller the aperture; the greater the depth-of-field; the less light that goes into the camera.
This really confused me when I first began learning how to operate a pro camera until I realized the that numbers represented fractions, i.e.: f/2.8 divided by 2 = @ f/4 , f/4 divided by 2 = @ f/5.6 and so on.
Shutter-Speeds control how fast the camera’s shutter opens and closes. This effects the amount of light that comes into the camera and also can determine whether or not an image is in sharp or in soft-focus. Shutter speeds are also listed in fractions (of a second). So, a shutter speed of 1 second is going to keep the aperture open longer than, say, one at 1/1000 of second. If you are wanting to capture a sharp image of a moving subject you must typically set your aperture at 1/125 of a second or less.
There are two approaches that you will most likely have to choose between when composing an image: aperture priority or shutter priority. A good example of a typical aperture priority image might be a “classic Ansel Adams” type of landscape. This is a situation in which you want every rock, tree and tumble weed from where you stand, to the distant horizon, to be in sharp focus. In order for this to occur you are going to want “stop-down” to your smallest aperture (f/22 - f/32 in most cases). Because this is a very small aperture very little light will be entering the camera which can affect the exposure time. So, you must compensate for this by choosing a much slower shutter speed in order to allow the needed light to enter the camera.
A shutter priority image is one where you want to freeze some sort of movement. It might be that you are photographing a sports event and want to make sure that the ball is frozen in mid-air or perhaps you are trying to capture a crystal clear image of a salmon leaping its way up some Alaskan river; either of these would be shutter priority images.
2.) Paralleling the Subject:
When you are creating a close-up photograph of a small subject camera position can have an incredible impact of the results that you get. Because depth-of-field is usually very limited when a subject is being photographed at 1:1 or greater, a movement of just an inch can drastically alter the composition. The photographer must identify the ‘important’ part of the subject that he/she would like to have in sharp focus and attempt to keep the back of the camera (or film plane/digital sensor) as parallel with the subject as possible. This process is very time consuming but can be made easier by using a sturdy tripod to hold the position of the camera.
IV. Composition Techniques–
1.) The Rule of Thirds:
This is one of the most widely used ‘rules’ in photography: Mentally divide the image the image frame into three equal pieces horizontally/vertically and place your subject into one of these spaces. This will help you to avoid placing the image in the center (which is generally not a good ideas but as with most rules, there are exceptions). This will put you on the right path towards creating an image that is interesting and visually pleasing.
2.) Horizontal or Vertical?:
Consider your subject before defaulting to a “horizontal” or “vertical” composition. Although we Westerners tend to scan information from left to right and find a horizontal composition to be a natural choice this isn’t always the best choice. Some images simply call for a vertical composition.
3.) Understanding the Relationship Between Positive and Negative Space:
It is human nature to just focus on the subject when making an image. However, the negative space –or space surrounding your subject– is often as powerful as the main focus area when it comes to affecting how an image appears. If used correctly, negative space can give the viewer’s eye a chance to rest and serves to guide the eye throughout a composition. In order to take an image to the ‘next level’ every aspect of the composition becomes a factor in determining the final outcome.
4.) Pay Attention to Backgrounds:
I cannot tell you how many times I’ve taken what I consider to be a great image only to revisit it later and notice a twig that appears to pierce my subject’s head. Often, only a minor adjustment in camera position is needed to make a mediocre image into a truly great one. Pay attention to what is behind your subject! Use aperture to control how much or how little of the background is in focus; little things done well add up to make a successful photograph!
Subscribe to:
Posts (Atom)