 In my photography workshops, I often hear complaints from students who just can't seem to get a sharp image with their digital cameras. This results in many students looking backwards to the "good old days of film" when almost every image looked sharp as a tack. Fortunately, I've got some comforting news for you; digital images are inherently softer and this will often have little to do with photographic technique. This certainly isn't meant to be used as an excuse to slack off on your technique but rather a true statement that addresses an issue common to almost all digital camera users.
Now before I begin, I should dredge up the old cliche' that there are, in fact, exceptions to almost every rule and photography is not exempt from this tenet. Some images do turn out sharp based on shutter-speed, a steady hand and often applied in-camera sharpening. For anyone wanting to take their digital photography beyond just snap shots, though, I would encourage you to avoid adding any sharpening in-camera. This will limit your ability to resize an image for publication or prints in a variety of sizes and will add unwanted degradation to your image in many cases. So, caveat aside, how then does one sharpen an image? The answer is an initially confusing –albeit important–little filter in Photoshop called 'Unsharp Mask', which, by the way, at first reading sounds like it would create the exact opposite effect that you're trying to achieve.
In Photoshop, open up an image that needs sharpening and follow these simple rules for fast results.
1.) Go ahead and set your image view to 100%. This will allow you to keep a close watch on the edges within the image and help you to see if any unwanted noise, or 'fractals, begin to appear.
2.) Open up the Filters Menu and select 'Unsharp Mask.'
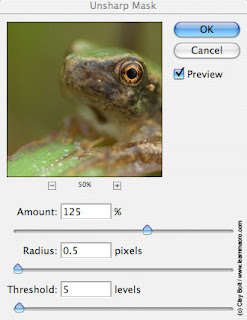
You'll notice that there are three sliders in this dialogue box: Amount, Radius and Threshold. All three are important and I'll tell you from the beginning that most images require settings of their own unless you are adjusting a series of images that were made simultaneously or in a very controlled setting. Experimentation is the key. Before I go into to what each slider means, let me briefly explain to you how Unsharp Mask works.
In the most basic terms, this filter looks for areas within the image where light and dark areas – or groups of pixels– meet. To increase the appearance of sharpness, USM adds varying intensities and amounts of white and black pixels along these edges to give the impression of a sharper edge. So, for example, it will add white, light colored pixels along a dark edge to give the impression of a highlight and darker pixels along a lighter band of pixels to give the appearance of a shadow. This is how the process works in a nutshell. Now, let's get back to how to sharpen your images.
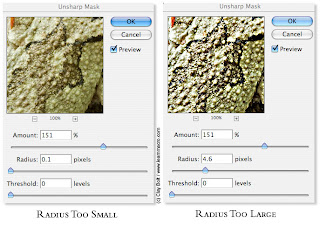
3) RADIUS: I'm going to start with this slider because I believe that this is really the first option that you should consider when adding USM. This option literally refers to the size of the dark/light pixels being added to your image. You will be more successful in your sharpening attempt if you opt to start here. Here is a good rule of thumb that I once heard: if your images contains a lot of detail –say, tree bark, for example– you are going to want to select a smaller radius number because the filter will be able to find a lot of nice, defining edges to sharpen. Add too much of a radius, and the image is going to make your eyeballs pop out with overdone, super unrealistic looking sharpness! With this filter it is often prudent to fall slightly under tack sharp than over it. If your image is generally very soft –say a mist covered field– then you'll want to increase your radius because the filter is going to have a harder time finding a delineating edge, therefore making it more difficult for it to sharpen the scene. In other words, it is going to have to work harder to increase the impression of sharpness.

4.) AMOUNT: This basically refers to intensity –or brightness and darkness– of the pixels being added. Be mindful of this setting because too high of a number will give a very false looking, 'hyper-sharpness' to images. This is why you need to view the image at 100% while adjusting. However, the good news is that you can check the preview option and watch how the amount effects the image by sliding the amount up and down.
 5.) THRESHOLD: For ages, I would simply ignore this option because I had no clue what it actually meant. However, once I explain it to you, it should make perfect sense. Taking into account what I've laid-out above, you should now understand that Unsharp Mask lives and dies around finding edges and adding contrasting pixels there. However, what if you have an image where you only want to sharpen a very small portion and not affect the rest? Well, you could do what I used to do and select this small section with a clipping path or lasso tool, feather it and apply USM. However, this is pretty time consuming and often unnecessary. What if you have an image of a bird flying across a nice, clean blue sky. You want to make the bird tack-sharp but in order to do that, you'll need to have a fairly small radius and increase the amount of the pixel intensity. Unfortunately, by doing this you will add a lot of unwanted noise to the sky which is already perfect as shot. The solution? Increase the threshold. In short, an increase in threshold will limit the effect of the USM only to areas with more obvious edges. The more you increase the threshold level, the less the 'softer' areas of the image will be affected. In the case of our bird example, you should be able to set the number to a high enough level to only sharpen the bird and nothing else.
Now that you know the basics the best way to learn is to experiment. However, one final word of advice: always save an unsharpened version of your files. Not only it is good to have a back-up in case you make a mistake but, depending on the size of the file, or how it will be used (art print, magazine, etc.) the amount of sharpening may vary.
Happy Sharpening!
Clay


7 comments:
Wonderful post - thanks for explaining all this. I've been using Photoshop Elements and have found USM to be extremely useful (especially since I'm still using a little 6.2Mp point-and-shoot); however, it was all trial and error without really understanding how or why it worked. This information should allow me to make even better use of the feature.
I can't wait until I can buy a good digital SLR and macro lens!
Hey Ted,
I was in the same boat with USM a couple of years ago until I picked up some of the tips in the post. So glad that it helped!
You do a fine job with your point and shoot; can't wait to see what happens with a DSLR.
Clay
Wow! Sounds stunning.
Hi Clay,
I keep coming back to this post, because I'm still having a hard time keeping it straight what the different sliders do. Experimentation is the key, however, as you have noted.
Can you explain how USM differs from the auto sharpen function in PS Elements? Should I do one or the other or both - if the last, which one first?
Muchas gracias for your help.
Regards--ted
p.s. Note that my blog address has changed to http://beetlesinthebush.wordpress.com.
Linky no worky - try it without the "www." ;-)
regards--ted
[...] A great post at 'Natural Imagery' for further reading about the Unsharp Mask[...]
Thanks for the nice post........
havenlife@rocketmail.com
Post a Comment