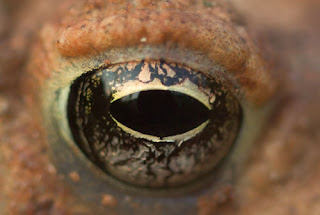
Photographers who are extremely proficient at making beautiful images often express dismay when they see their photos turn into a pale, pixelated resemblance of 'what-was' on-line. Fortunately, there are a few simple things that image-makers can do to increase their odds of creating very pleasing, web-ready images. This very basic and brief tutorial offers several tips that, if used properly, will keep your images looking beautiful on-line.
There are four important areas to consider when preparing an image for Web usage:
1.) Color Space and Color Mode 2.) Sharpness 3.) File Size (which impacts download speed) 4.) Method of Export1.) Let's address the first issues: Color Space and Color Mode.The
wikipedia definition is: A color model is an abstract mathematical model describing the way colors can be represented as tuples of numbers, typically as three or four values or color components (e.g. RGB and CMYK are color models). Got that??? More simply put, images need to have certain color spaces assigned to them based on how and where they are being used. It's kind of like looking at the weather report before you head out for work; if it is going to be raining then you wear a rain coat; if it is cold then you wear a sweater. At the end of the day, you are still the same inside but you've just modified yourself –or your appearance– to suit the climate. The color space that works best for the on-line climate is
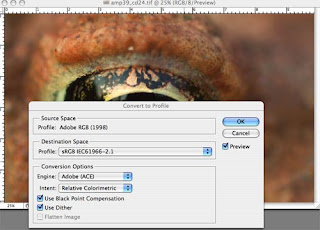
sRGB IEC61966-2.1. This is the color space that presents the most accurate and, more importantly consistent color on most monitors. To set your color mode in Photoshop (CS2), go under Image/Mode/ and select RGB. To set your Color Space go under Edit/Show All Menus/Convert to Profile and scroll down to sRGB IEC61966-2.1 under destination space then select OK. It is simple as that. Now onto file size.
2.) File Size: If you thought people were impatient five years ago regarding digital and electronic matters, things are much worse today. In an era of high-speed connection and the world's increasing demand for instant results, knowing how to create images which load quickly on a page is an essential skill to posses. This
article states that the average time that a web-surfer will spend waiting for your site to load is 10 seconds! It's quite possible that this writer may be too generous in their estimation. So, as you might guess, the smaller the file size, the faster the page load.
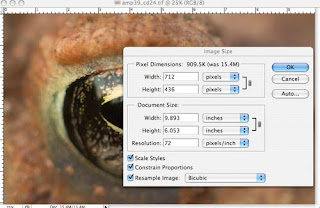
Many of you may know that an image can be transformed into a jpg by simply selecting 'save as' under file/save. However, this isn't the best way to create a jpg for web. This is partially due to the fact that by doing this, your image will also include a space hogging thumbnail of the image as well. Fortunately, there is another method that is both effective and easy to use. Before we get to that, though, you must first make sure that your image's resolution is suitable for web. The industry standard for image resolution is 72 dpi. To see what your image's resolution is in Photoshop, simply go under the 'Image' menu and select 'image size' where you'll find a box containing the magic number. If it is above 72, you can change the number by simply typing in your desired resolution. TIP: In order to keep the physical size of your image from shifting, you must have the 'Resample Image' box checked. Also remember to always save a copy of your master file just in case you make a mistake.
 3.) Sharpening:
 It is at this point that you will want to sharpen your image. However, since I recently covered how to use Unsharp Mask in an
earlier post I'll refrain from doing so again. After this step is complete, congratulations, you're ready to export!
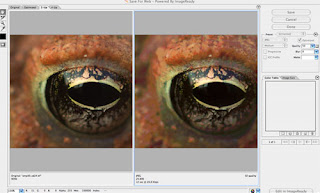
4.) Exporting: Scroll down under the 'File' menu and choose 'Save for Web.' A new window will now pop up on your screen with several tabs across the top. Select the one labeled 2-up. Now you'll see a before and after version of your image; the after being what will be exported to the Web. There are many different options and ways to determine jpg quality here but I like to use 'Optimize to File Size' which can be found under the small drop down activated by the black arrow on the far right-hand side of the window. Once selected, you will be given a text field where you can input the size that you want your image to be. I like to start at 30k as this a fairly quickly loading file size. You should begin to see some differences in image quality between the left and right images on the export screen. Don't see what you were hoping for? No worries! You haven't made any permanent changes so just go back under the 'Optimize for File Size Window' and type in another number until you are pleased with the outcome.
Finally, select 'Save' from the 'Save for Web' menu and your job is done. All you have to do from this point is upload the image to your website or blog!

 I just returned from a trip down into the Eastatoe Gorge in Northwest South Carolina. This special place is one of the epi- centers of South Carolina's temperate rain forest and home to some amazing plant and animal life. Most notably, perhaps, is its variety of filmy ferns, which include the only North American location of the Tunbridge Fern (Hymenophyllum tunbridgense) and another species that is only found otherwise in South America. I was able to locate Taylor's Filmy Fern (Hymenophyllum tayloriae) but was unfortunately unable to locate –just yet– the more photogenic Tunbridge. I hope to make another trip down into the Gorge this spring and see if my luck improves.


